10 Ways to Use Google Forms in the Classroom
Google Forms often gets overlooked as an edtech tool, but the variations of assignments, forms, and activities it can create is pretty awesome!
Here is a list of 10 ways you can use Google Forms in the classroom.
1. Survey
This is probably the most common way Google Forms is used. You send out surveys for various reasons throughout the school year like a parent survey, demographic survey, consent form, collecting contact information or a survey to collect opinions on a certain topic. If you want the survey to be anonymous, do not ask for a respondent’s name and do not collect their email.
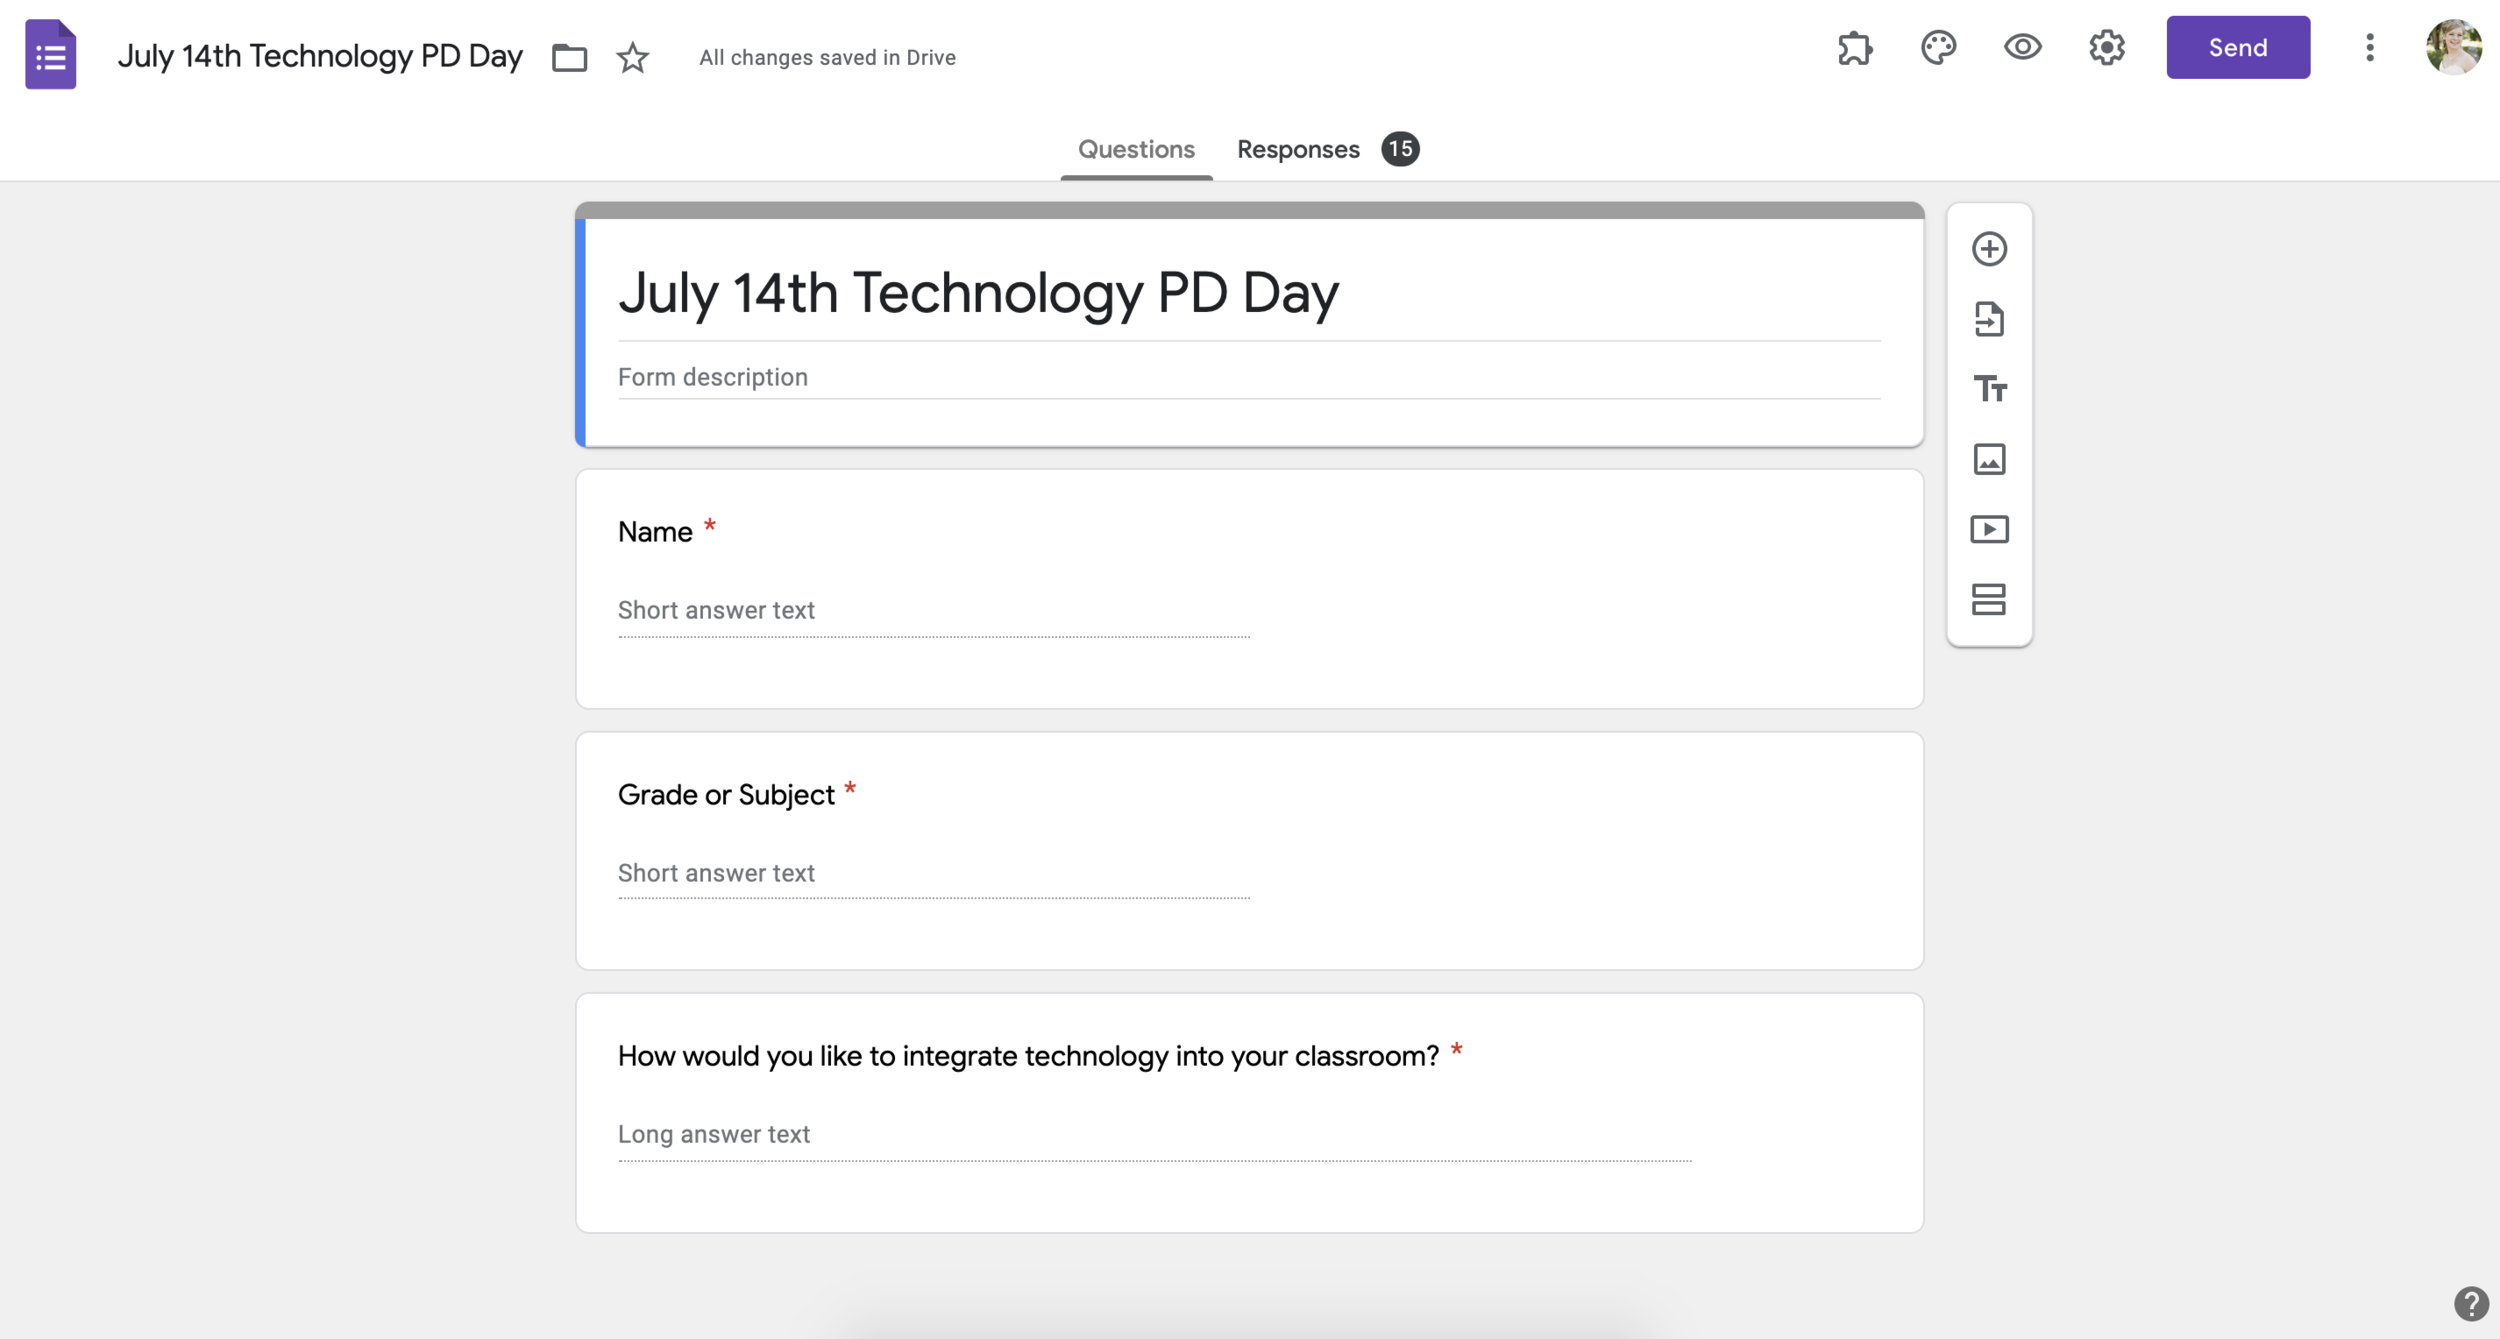
Below is an example of collecting student information for a student organization.
2. Formative Assessment
If you want a quick on pulse on your student’s learning, you can create a reusable formative assessment form for your students to complete. You can create multiple formative assessments to have ready to send out to your students quickly at the end of the lesson or just have one form that has 1-3 blank questions and you ask the question orally in class. You can either share the link during class or have them prescheduled in your learning management system to send out toward the end of class.
PRO TIP: To make your formative assessment forms flexible for all your classes, make sure to have the first question be their name and the second question be a drop down of what class they are in. This way when you are looking at your spreadsheet of answers, you can easily see which class the answers came from. Now you can use the same Google Form for every class again and again.
3. Exit Ticket
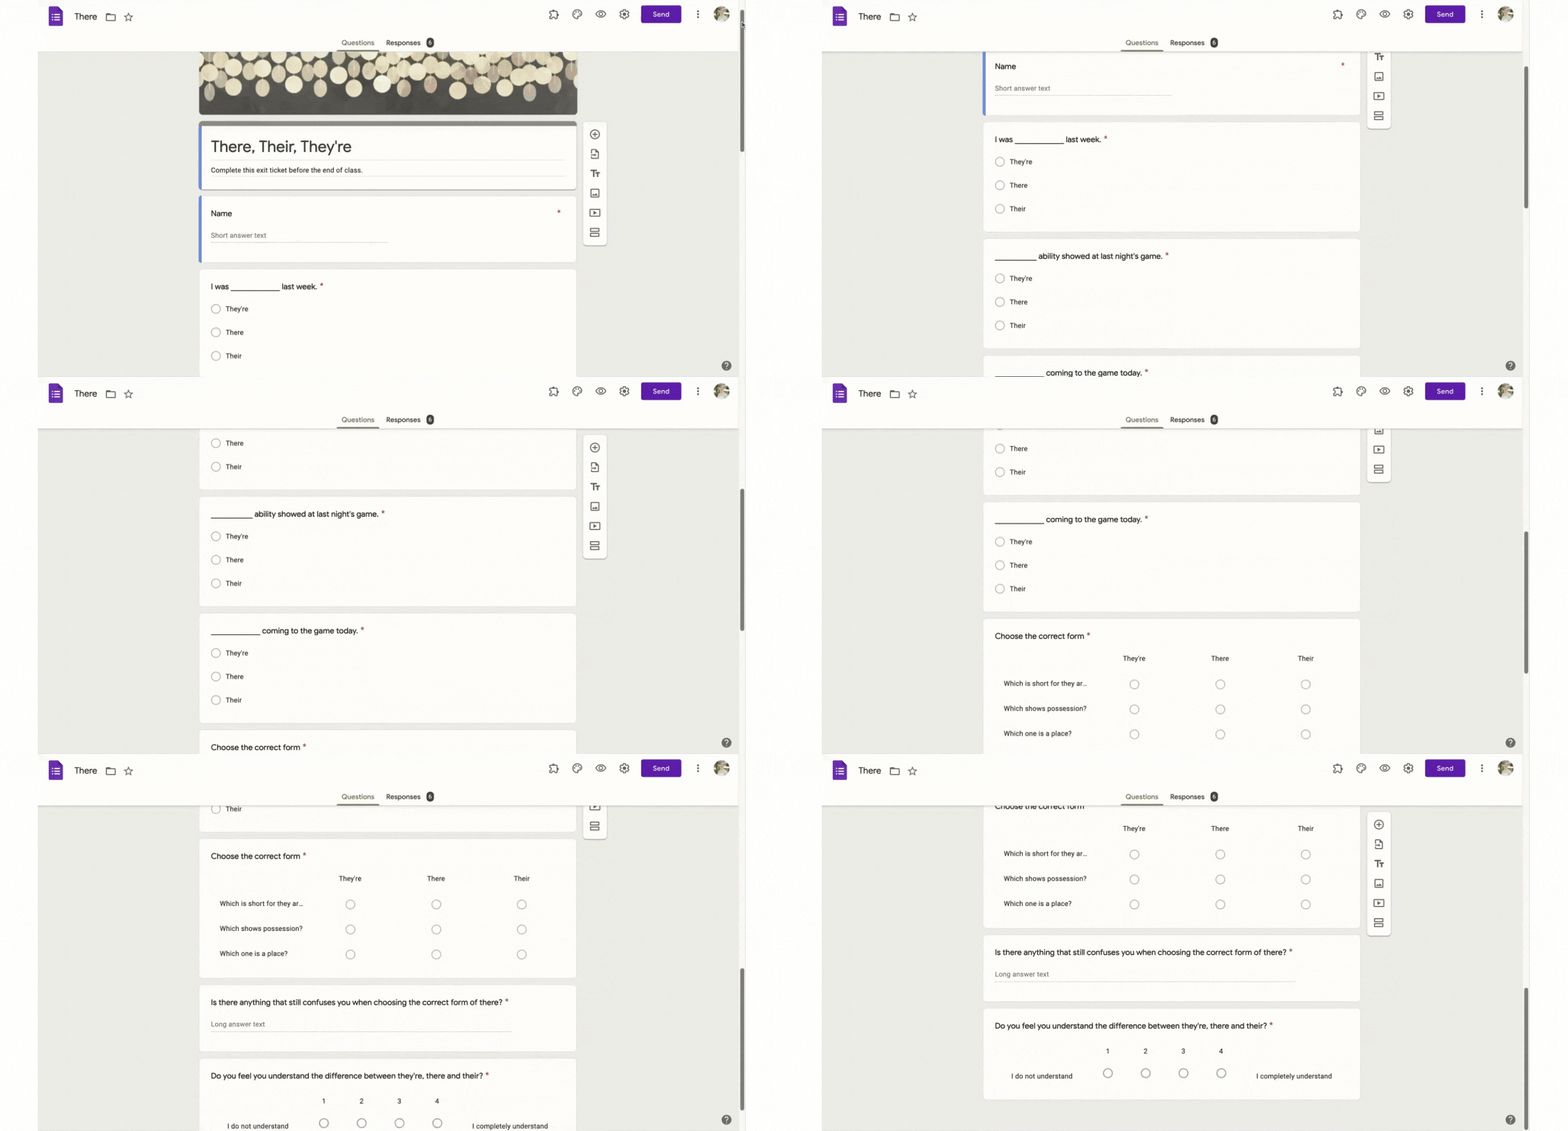
This is the most popular type of formative assessment to use. This can be a simple form with 3-2-1 questioning or it can be an exit ticket of just simply name one thing you learned today. Remember you can use this same form for every class.
Exit tickets can be content specific as well like this short clip shows below.
PRO TIP: You can use the same exit ticket for the end of each class and have it linked in your learning management system as exit ticket. Since it is the same link every time, you can post it once and just instruct your students to complete their exit ticket for the day. It will become classroom culture that at the end of class, we click on the exit ticket and complete those quick questions for the day.
4. Quiz/Test
I love to use Google Forms for a quiz or test. You can do any variety of question types and if you want it to auto-grade it for you, it will! To turn on auto-grading in Google Forms click on your gear settings, then click quizzes, then turn on “make this a quiz”. Once that is turned on you can add point values and correct answers to each question. This feature is best for multiple choice questions, but it can also auto grade fill in the blank questions if the student spell the answers correctly.
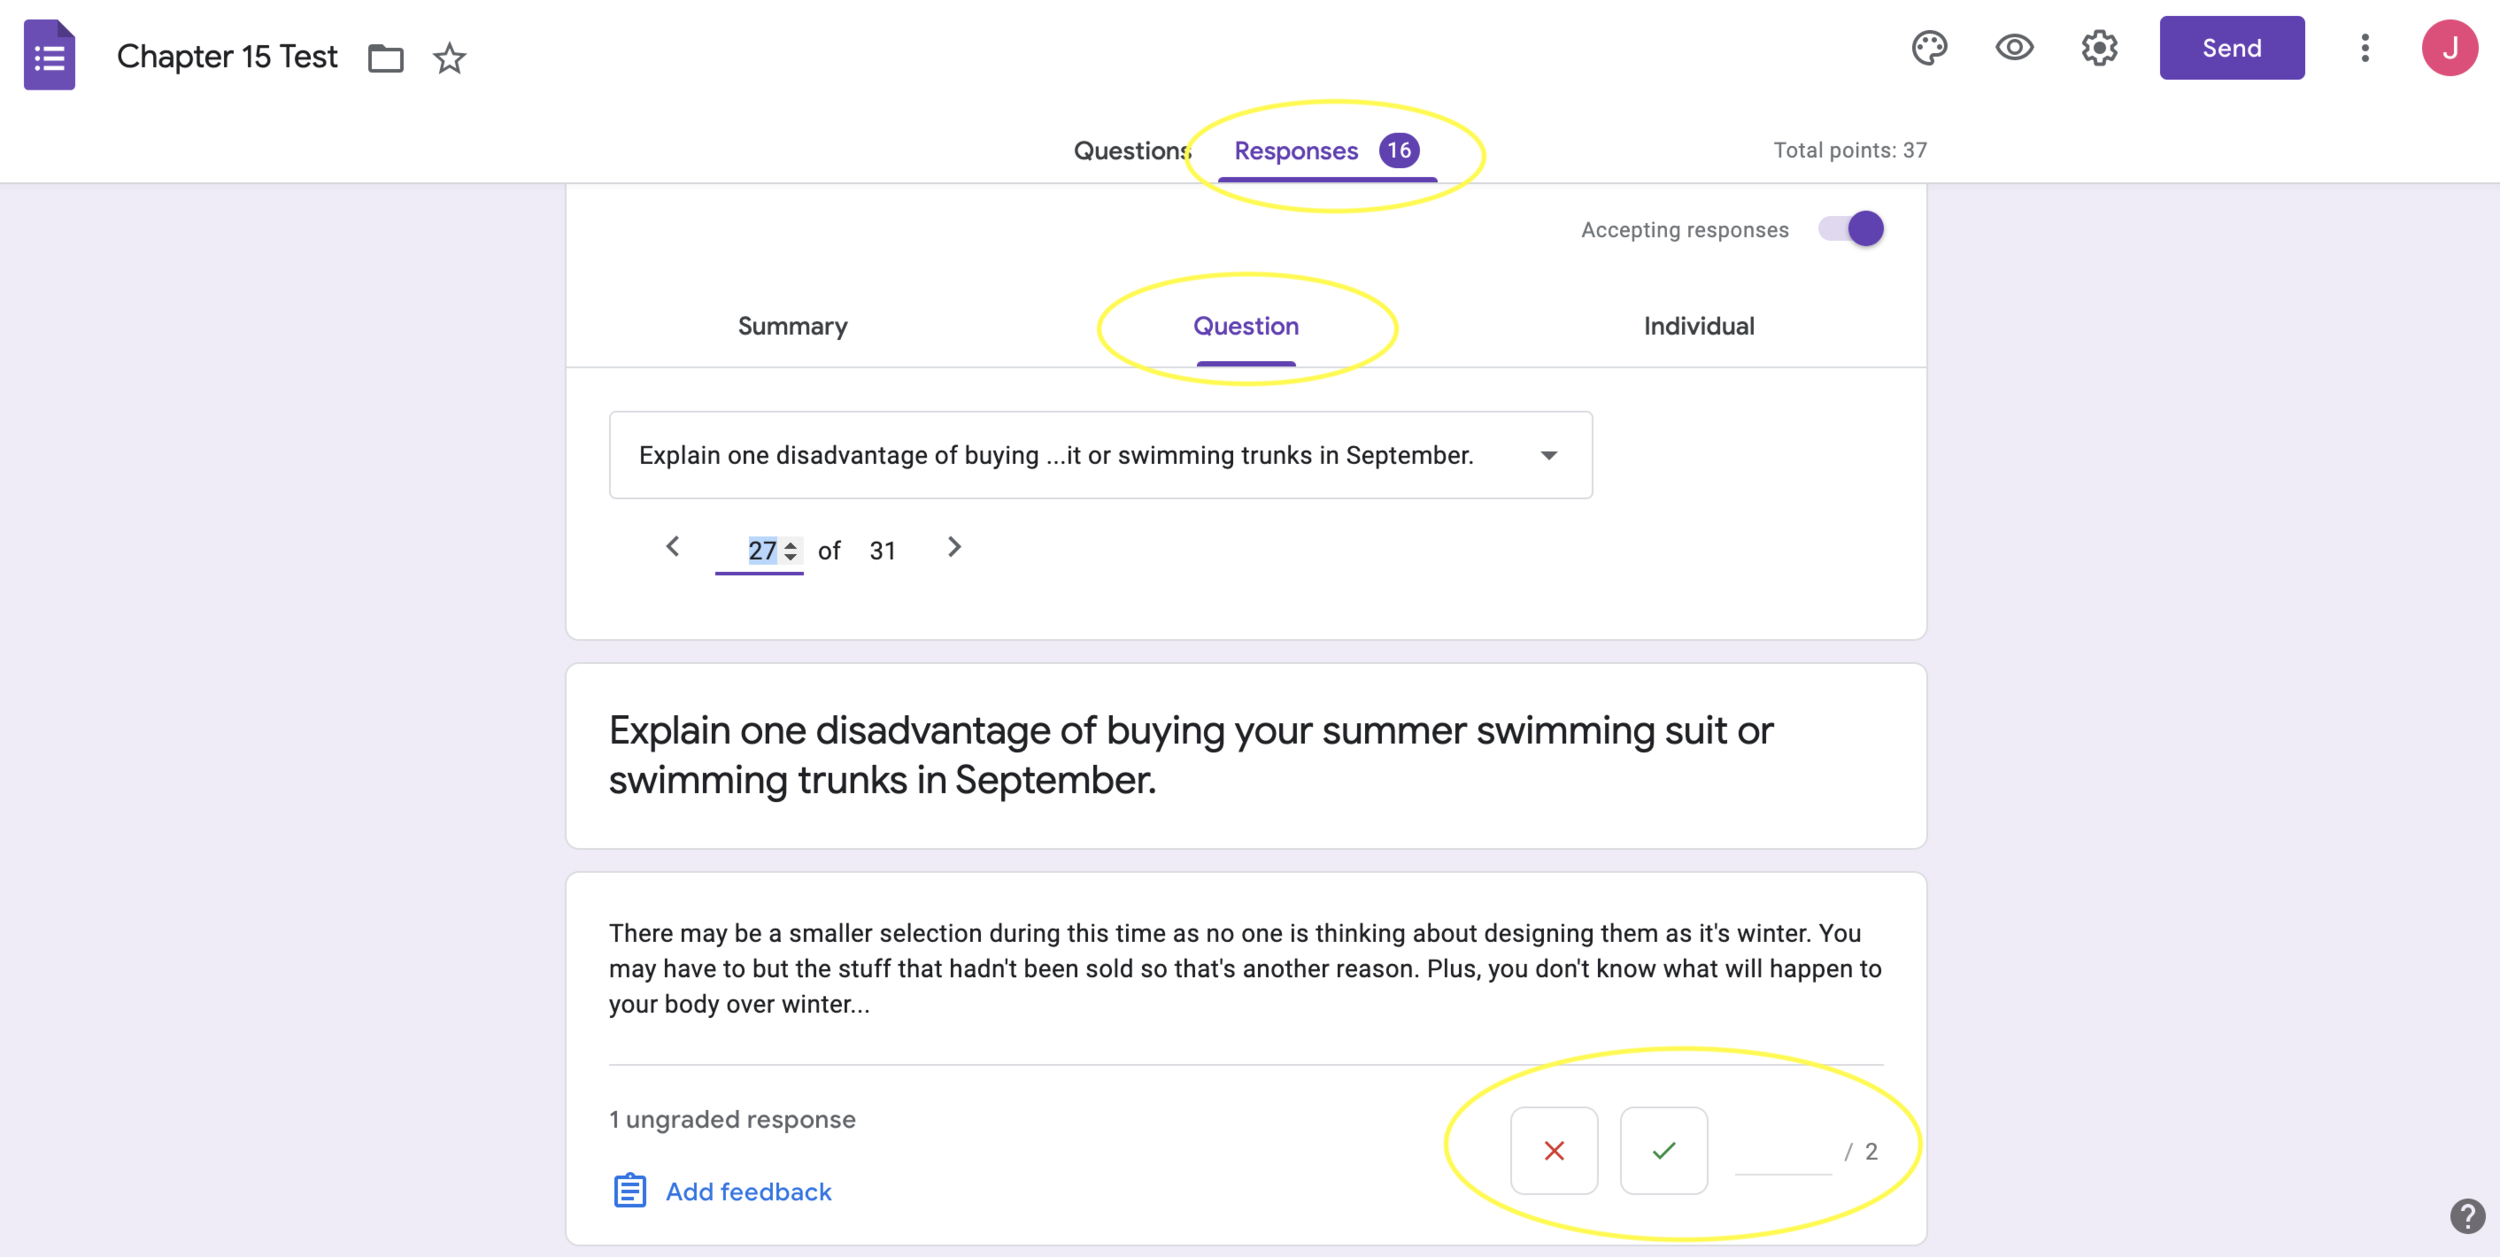
PRO TIP: When grading the fill in the blank questions manually like short answer or paragraph answers, click on the responses tab, click organize by question and you will see each question individually. From there you can grade each answer quickly by putting in the point value earned, clicking the red x for no points, or the green check mark for full points.
5. Picture Assignment
You can embed pictures into Google forms which makes this tool more versatile for teachers to use. If it is faster to take a picture of your textbook or a screenshot of an example than to recreate a picture or re-write the text, then use pictures as the question. The whole form does not have to be all picture questions. You can add a picture into any other form as well.
6. Sign-Up Sheet
We are always using sign-up sheets in education. Signing up for class parties, volunteers for work events, parent teacher conferences, and the list goes on… Google forms makes it easy to create and reuse sign up forms to get the data quickly and form responders do not need a Google account to complete form. They just need the link.
PRO TIP: Add the Choice Eliminator Add-on to your google form so as options are selected or signed up for, the choice is no longer an option for next person.
Registration page example of a sign-up form.
7. Check-in Form
Google Forms is great for check-in forms because the answer spreadsheet Google Forms will create timestamps all responses. I see this type of formed used for high school study hall classes where students need to check in and out of study hall to use the restroom or go take a test and the form is really simple for them to complete. It also creates a data document with exact times a student left and re-entered the classroom if needed later.
8. Help Request
If you are responsible for maintaining any technology or are an aide that helps with copying papers or laminating or in charge of anything that you people request something to be done; you can create a help request form. These are commonly known as “tickets”.
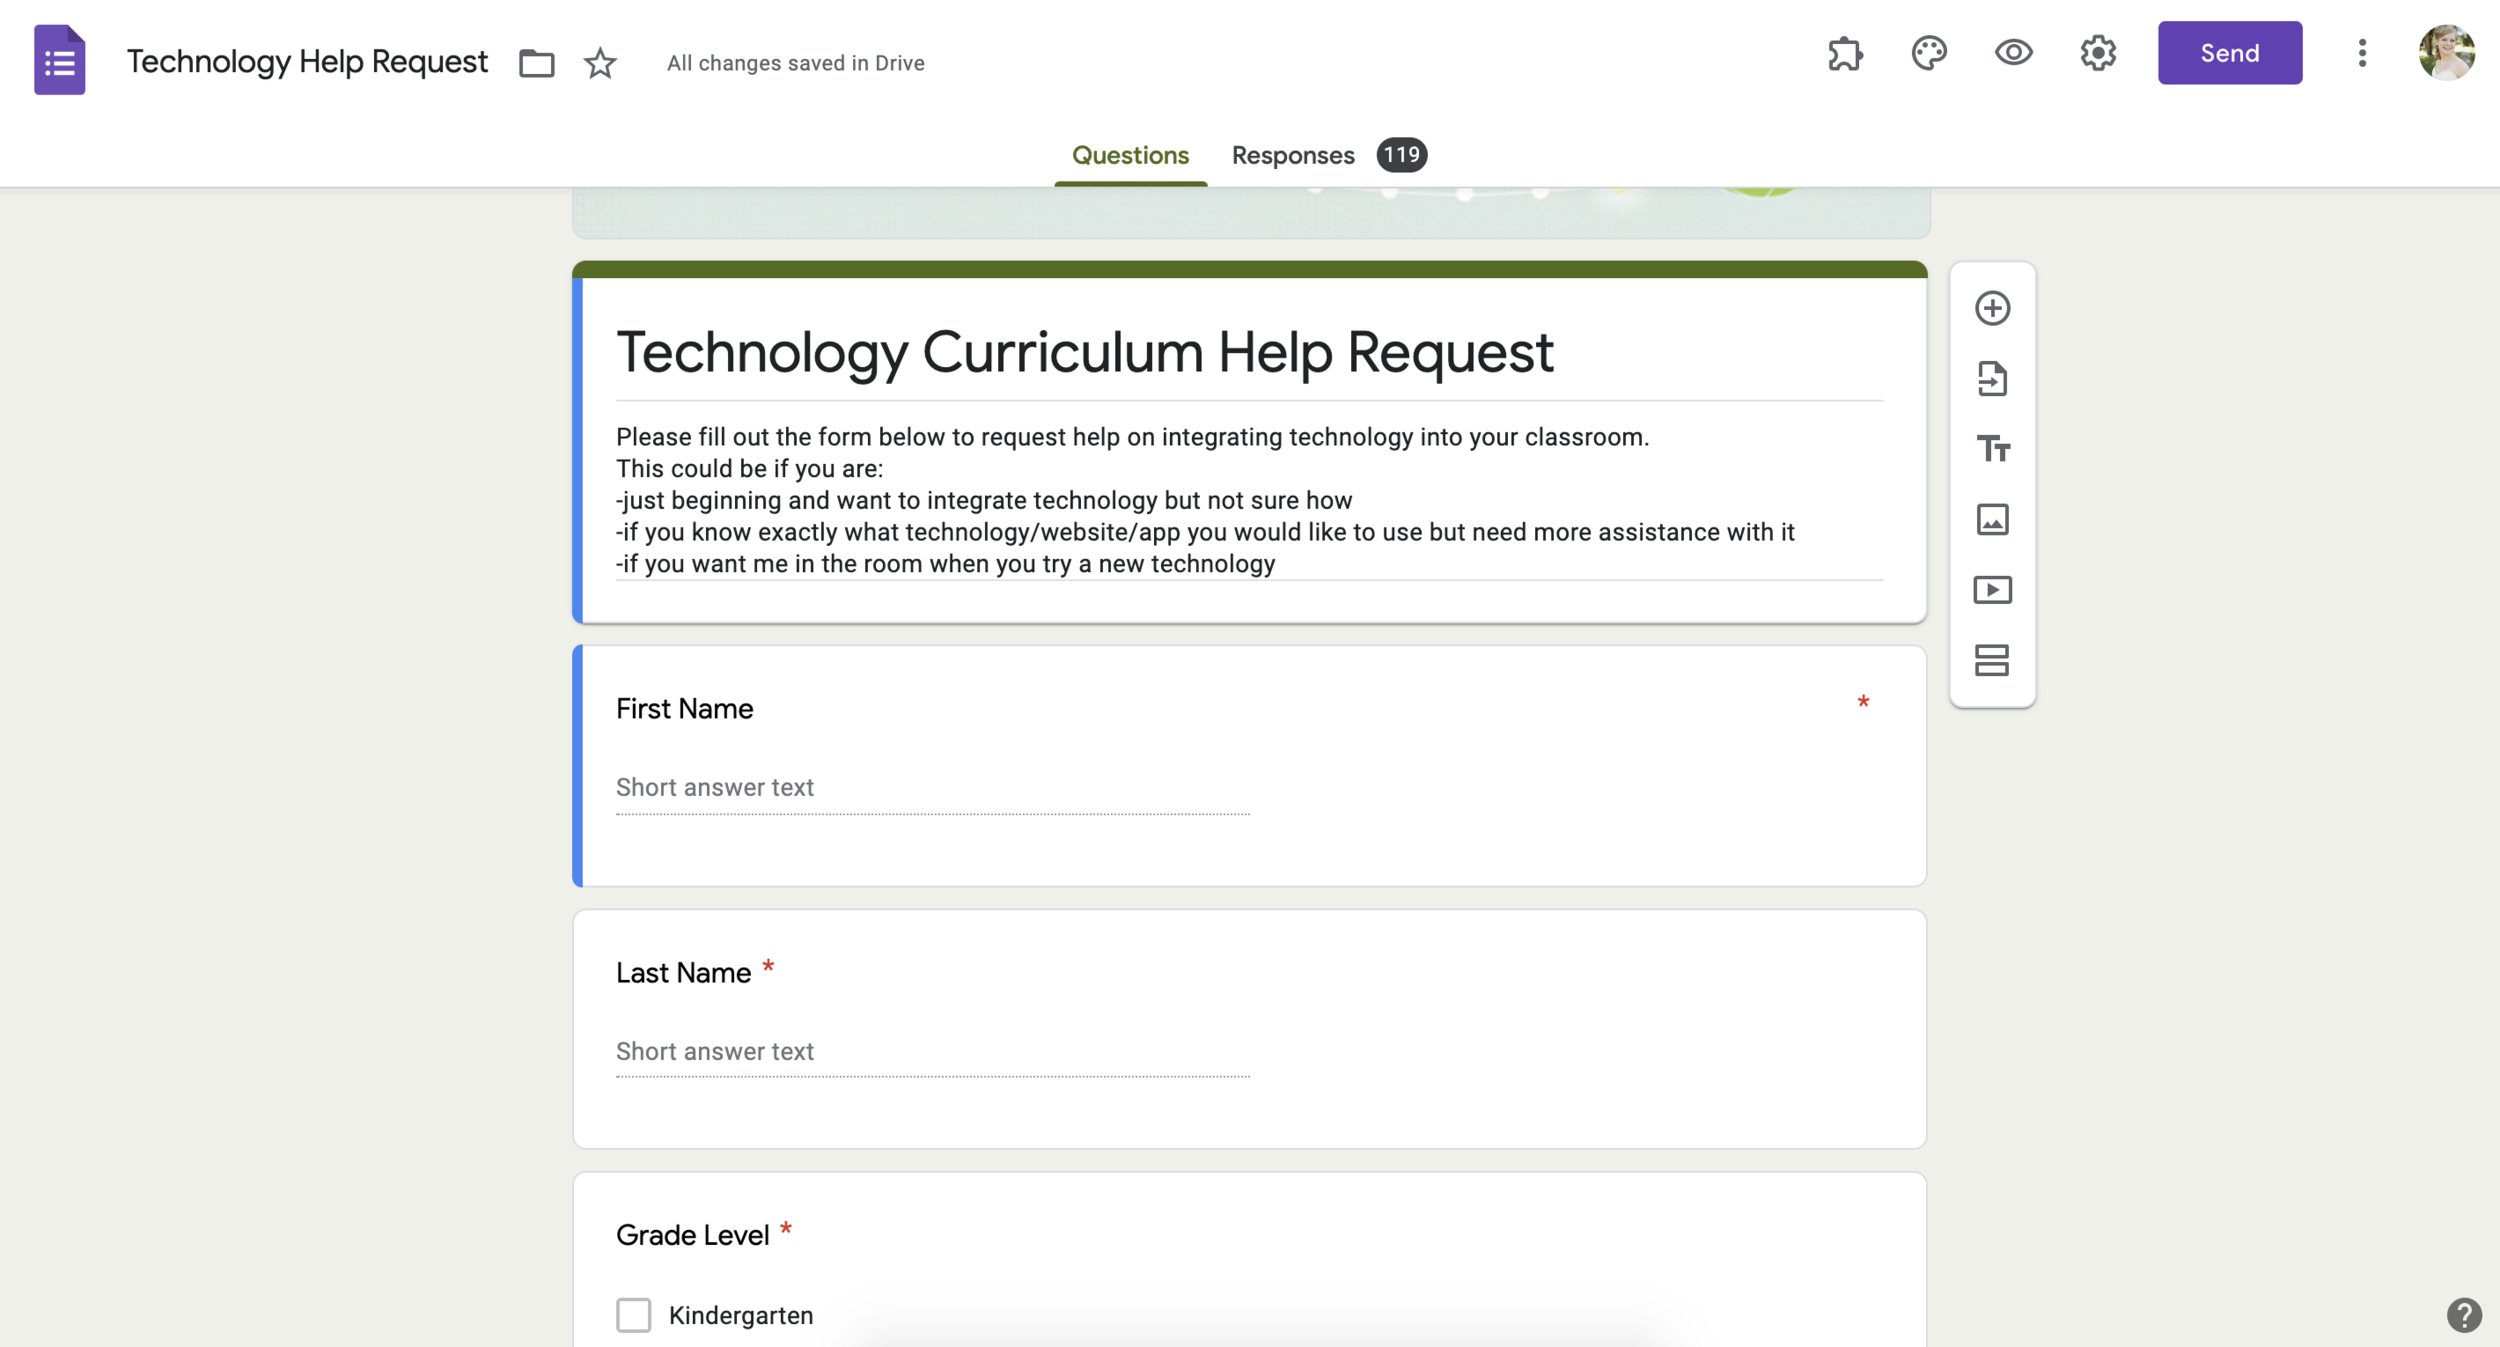
Help Request Form Example
For example, a technology department would have a link to a form that a teacher or student would fill out when they are having computer problems. The ticket would ask for their name, to explain the problem, and when a good time to meet would be to resolve the issue. This creates an easy way for the person to request help and it creates an organized list of tasks the technology department needs to complete.
PRO TIP: As requests come in and you complete them, highlight that row in a different color so you can easily see the new unhighlighted requests that need attention.
PRO TIP 2: Use the “Get email notifications for new responses” setting to receive an email each time someone completes the form. This way you do not need to constantly check the form, it will send you an email when there is a new response.
9. Behavior Log
Sometimes we need to track student’s behavior and having a quick and easy way to do this is imperative, so we actually do it! If you are doing this for your whole classroom, you can create a two-question form that you a link to save on your computer or tablet that asks for the student’s name and behavior observed. If you multiple teachers are tracking the same student, create two question form that includes the teacher’s name and the behavior observed. The response spreadsheet will automatically time stamp it and you will have a very organized data sheet on one student’s behavior from multiple teachers.
10. Choose Your Own Adventure
This one is so much fun!! Inside of Google Forms you can send the respondent to a different set of questions based on their responses. This is like the choose your adventure books where every student will start at one question and branch out from there all ending with a different path more than likely! You can also use these for ethical scenarios or yes/no paths where students make decisions.
They are a little bit of work to set up, but kids love them and can be used again and again where students go on a different path each time. To set these types of forms up, use multiple choice questions and add sections as new paths. Then connect all the sections by click on the three dots and selecting, “Go to section based answer”. Make the selections for each answer.
PRO TIP: Expand on this activity by having students write about the decisions they made and how they affected the character or what happened when they selected each answer. They are so many ways to set these paths up but including a journal prompt at the end or journal as they go is a great way to bring it all together.
When using Google forms these five general tips will help you use it the most efficiently.
1. Have the first question of every form ask for the person’s name unless it is meant to be anonymous.
2. Use the answer spreadsheet to view your data. This Google Sheets document updates live so no need to create a new one each time. It will automatically refresh but if you do not see new answers coming, just refresh the page.
How to: To have Google automatically create this for you, click on the responses tab and then click on the green spreadsheets icon.
3. Use auto-grading if you are going to use this quiz or test again to save yourself time in the future. If only using it once and it takes longer for you to put in the answer key than grade them later then it wouldn’t make sense to put in the answer key.
4. Turn on the “Get email notifications for new responses” setting to receive an email each time some completes the form if you want to be notified.
5. Use the required question option to force the respondent to answer the questions. When you use this setting, it will not let the respondent submit the form until they have answered all the required questions.
As you can see the free Google Forms tool can serve you and students in so many ways. Enjoy implementing this list and getting your data easily, quickly, and in an organized fashion!


